The Purge

Sadly, summer, my favorite season, is winding down! This is the time I clean out the closets getting rid of clothes that no longer fit. It’s so much easier and faster to give away or discard my sons clothes. My clothes, not so much! I have sentimental attachment, especially to garments I’ve made! Yeah, I’ve tried to rationalize that someone else in need will get to appreciate them, but truth is, I’m still appreciating them! Don’t get me wrong, I donate lots of clothes each year but it’s not easy! How do you decide what to give away?

Definitely NOT giving away!

Definitely NOT giving away!

Not my snakeskin top!

Not my snakeskin top!

Not my $5 Prada fabric turned skirt

Not my $5 Prada fabric turned skirt

Maybe I can let this one go!

Maybe I can let this one go!

Maybe this can go!

Maybe this can go!

This can go!

This can go!

Ok I guess this one can go especially since I have 2 more versions of it!

Ok I guess this one can go especially since I have 2 more versions of it!

My Ugly Baby

I have been obsessed with all things leather! The look, the smell and more importantly, the construction of leather bags, purses and accessories! There are some wickedly talented folks out there who’s creations are uber stunning! I can’t tell you the countless hours spent on watching how-to videos trying to de-mystify the process! With each video, I came away thinking that I needed every tool used in the video to accomplish similar results! So far, I’ve only purchased a few tools and have an extensive wish list of other tools that will undoubtedly make “the experience” easier and more enjoyable! I would even accept the items on my wish list as a Christmas or birthday gift from my hubby!

So what I’ve accomplished thus far by watching Arthur Porter of Dallas Designing Dreams videos is this tote bag.

20150810-212328.jpg

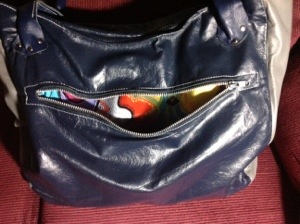
Not too bad for my first time but it definitely has its’ flaws! I sewed it on my old commercial Singer machine that sews race-horse fast which is very intimidating! Needless-to-say, my seaming suffered because of it! And as we all know, there are no do-overs with leather! After ringing my hands over some irreparable damage, my inner Tim Gunn kicked in and the front panel which was originally planned to be a single color, became two-tone! In hind-sight, I like it better now!

20150810-212948.jpg
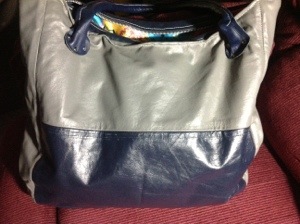
So, not all foul-ups are a bad thing!
The hardest part was figuring out what kind of straps to make and how to construct them properly!
For months, this project lay dormant just needing straps! How intimidated was I by theses freakin straps! I finally said to heck with it and threw some straps on just to get it done! They are awful! But I still had a sense of accomplishment knowing that I finished it! And because I live by the mantra of “If I make it, I wear/use it”, I now use it for my work tote! As I’ll-constructed as it is, I actually have people wanting me to make them one!

20150810-214532.jpg

20150810-214604.jpg

20150810-214713.jpg

20150810-214727.jpg
Go figure! I even have a name (jokingly) for my collection..my Ugly Baby line! Even with the flaws, I love the functionality and roominess! No need to carry a purse with my Ugly Baby! Hopefully, with more practice, the UB line will disappear only to be replaced by beautiful babies!

Kimono Self Draft

I purchased this beautiful lightweight silky, almost sheer knit goodness a last year from my local fabric store ( aka enabler). I had no idea (as usual) what I was going to do with it, but knew I just had to have it! It screams summer to me with all the pretty colors! I would take it out of my stash every so often to fondle it. Then yesterday, while I was doing just that, it finally spoke to me, no demanded that I allow it to flow like the breeze, be one with nature! In other words, it wanted to become a kimono! I love when my fabric makes demands! A kimono was the perfect choice! It showcases the print of the fabric beautifully and dresses up anything underneath because truly, who’s looking at the undergarments (not literally) when your wearing something so pretty??

I wore it belted today for a different look which I liked because the fabric is so silky that I find myself constantly pulling it up on my shoulders so the belt saved me some serious aggravation!

20150716-180640.jpg

20150716-180708.jpg

20150716-180732.jpg

20150716-180800.jpg

Stick To The Plan

I admire sewists who formulate a wardrobe plan, assemble all their patterns and sew according to that plan! I on the other hand, haven’t been able to stick to my plan! There’s always a new pattern sale to derail my plan! For instance, this Burda pattern I picked up and had to sew immediately! I really love the silhoullette! It has the illusion of separates but it’s actually a dress!

I used a black and cream rayon for the skirt from my favorite local fabric store, Habermans. I used a peachskin from Joanns for the top.

20140527-221043.jpg

20140512-191248.jpg

20140512-191339.jpg

The first one turned out so nicely, I decided to make it again!

For the next version, I had a yard of waxed cotton I bought a few years ago at a sewing expo. I had no idea what to do with it and thought it would be worth the experimentation! I paired it with an orange linen blend for the top. A very unexpected color combo, but I like it!

20140609-143652.jpg

20140609-143720.jpg

20140609-143750.jpg

I forgot to alter the skirt making it straight instead of a-line as I did with the first version. I may redo it later.
This is a nice, easy straightforward pattern. The only mild dislike would be the 2 pleats at the rear hip line area. They seem to call too much attention to that area! All in all, I really like the outcome!

Palazzo flow

I had been on the hunt for some interesting fabric to make some palazzo pants and of course, Habermans was reading my mind again! How do they know to have exactly what I need on my weekly visits?? I found this beautiful, multicolored jersey knit that was screaming to be made into palazzo pants! I used McCalls 6571, which is a one piece pattern! It doesn’t get much easier than that! The only design change I made was that I used a 1 1/2 inch elastic in the waistband instead of the 1/4 inch suggested. This was mainly to raise the crotch which was practically at knee level! And since I have a few color options, I made an orange top and a white top to maximize my wearing enjoyment although, the white top is not shown here.

Although I love my summer dresses, I will definitely be making more palazzo pants with this easy pattern!

20140527-214535.jpg

20140527-214601.jpg

20140527-214903.jpg

20140527-215446.jpg

Burda Lovin

image

Well, I am in love with my latest completed project (insert Cheshire Cat grin). To think, it all started with a downloadable (DL) Burda sleeveless waistcoat pattern! http://www.burdastyle.com/pattern_store/patterns/long-fur-waistcoat-102012 And since Burda DL’s don’t include seam allowance, I thought it wise to make a wearable muslin first! After a little tweaking of the muslin, I was ready to dive into the gorgeous faux shirling I bought at Joann Fabrics with my 60% off coupon! The total coupon price for 2 1/2 yards was $22.00! There’s just something magical about fabric, sewing and coupons! Said like the true addict I am!
So let’s start with the muslin. The fashion fabric used from my stash was from Walmart for a mere $1.00 per yard! Didn’t need a coupon for that! The fabric is a sturdy denim that probably is more upholstery than fashion but it worked wonderfully for this project and if it failed (not I, but it), I would have only lost $2.50 of the $4.00 paid for 4 yards! Piece of cake! The fabric used for the sleeves was also purchased from Walmart for a $1.00/yd. it’s the most awful mystery knit I’ve ever used but perfect for sleeves! Awful because it kept breaking my thread even after many tension adjustments. image
The real star is the faux shirling coat! Since I can’t do much with a sleeveless waistcoat, especially with the winter we’ve had in Michigan, I paired it with upcycled leather sleeves that were originally skirts I purchased from the Salvation Army for less than $10 bucks total!
image
I originally wanted to go with an animal print lining, but found this instead in the clearance section of my favorite fabric store Habermans for $4.98/yd.
image

image

image

Since the neckline is wider than an average coat, I made a fleece infinity scarf/hood which allowed me to get some animal print in!
image

And since I had the entire top half of the tan leather skirt leftover, I made a purse with animal print lining!image

image

I left the skirt zipper and fashioned it into a pocket to keep my cell phone or keys.

image

For those still reading this rather lengthy post, I say thank you! Now off to continue admiring my handy work!

Self Drafted Maxi

Well, it’s that wonderful time of year again to pull out the summery outfits from storage and make new ones too! And what would summertime be without a maxi dress or two? Well, okay I made six maxi dresses last year but who’s counting?? This season, I’m off to a slow start having only made one, so far! It’s wonderful to find a fabric that you know exactly how you want to showcase it! Like this knit I picked up from Habermans.

20130710-225634.jpg

It’s very graphic and supple and vibrant and and I can’t think of any other adjectives to describe how much I adore this fabric!

20130710-230732.jpg

I used Mimi G’s amazing tutorial ( for the second time). No dislikes there obviously since this is my 2nd version!

20130710-233433.jpg first version

Both are in heavy rotation! Well, on to he next project! So many projects, so little time!

Scraptastic

During the Memorial Day weekend, I went scrap diving thru my growing pile-o-sraps that my hubby wonders why I cant seem to get rid of! My response is always the same, although laced with some irritation… you see trash, I see fashion opportunities! also known as small projects like these two simple summer tops. I knew there was a reason I couldn’t throw away those lovely, psychodelic bits of fabric over the years!

20130618-203535.jpg
McCalls 6320 view B is perfect for a scrap dig! Just shy of 1 yard to make so you can’t beat that! This is my 2nd time making this top. I especially love this one because of this fabric.

20130618-221148.jpg

I really love the rhinestone buckle I found at the craft store. Adds a nice touch.

20130618-221412.jpg

I also made McCalls 6751.

20130618-224602.jpg

The photo on the jacket is sort of misleading. The model’s top is close-fitting at the waist which I like. My version was not close-fitting at all at the waist. I may tweak it a little to achieve that fit. Also, I used bias binding along the edges instead of doing the fold over method but I think the bias distorts the shape especially the back opening. Next time I’ll try it without the bias.

20130618-221945.jpg

20130618-222040.jpg
20130618-221945.jpg
My scrap heap got lighter by a mere 2 pounds but its a start!

Floral Frock

20130529-231256.jpg

20130529-225235.jpg

20130529-223949.jpg

20130529-224114.jpg
According to the fashion mags, floral is the trend this spring and summer. While I would love to say I made this dress to be on trend, truth of the matter is that I cut this out almost two years ago but I was extremely intimidated to start this pattern a second time! The first time I attempted this project about 4 years ago, it turned into an epic fail! I was an over ambitious newbie to the sewing world. Being ambitious is usually a good thing but knowing your limitations is also a good thing!

The pattern itself was not so bad, my problem was choosing a silky fabric! It was a beautiful fabric, the operative word being WAS! See for yourself… Cuz this is all that’s left of it!

20130529-224359.jpg
Obviously I’m still mourning the loss! But alas, I can covet a new and improved treasure that’s actually wearable!

This fabric is a stretch cotton floral that I manipulated to get this layout. The dark blue waistband was actually the bottom border. I thought it would be visually appealing and would break up the white bodice and top of the skirt.

20130529-225428.jpg

20130529-225659.jpg

20130529-230304.jpg

I was able to place the floral scraps just enough to get the print on the front of the sleeve cap only. It took every inch of fabric to get this layout.

20130529-225551.jpg
I am beyond pleased with the way it turned out! I omitted the pockets on this version remembering I got all kinds of corn-fused the first time around! I also reduced the width of the skirt cuz all that fabric just wasn’t flattering on me! Suzy Chin is back on my good list, I’m sure she’s pleased!

Ralph Chado Rucci

20130512-224748.jpg

20130425-230759.jpg
It’s done finally! My extremely long Vogue Ralph Chado Rucci project! I was so hesitant about starting this project for fear of botching it up! Then Erica B. published her detailed, instructional review! http://sewing.patternreview.com/cgi-bin/readreview.pl?readreview=1&reviewnum=82705. Because of her thoughtful review, I knew the alterations I needed to make. For instance, I didn’t want the neck slit as revealing as what was shown on the pattern so I reduced the slit but obviously not enough! Darn it! Oh well, I’ll just have to buy a matching camisole. Also, I needed to lengthen the skirt to a respectable length for my 5’7″ frame. I added 1 1/2 inches to the waist, then adjusted all my markings. And I had no intentions of making the pockets but I got a little confused on how to bypass that part of the directions, so as an afterthought, I added them. I read scientific protocols for a living but couldn’t figure out how to bypass the pattern instructions- go figure! Anywho, I probably should have raised the pockets up a tad bit more. The fabric used is a pale pink ponte knit which sewed nicely. And since I was using knit, I used stabilizer on the ties to prevent stretching. I have to admit that I didn’t even know what a gusset was before this project but I really like this detail. Gives it high style factor! Also, I had never made bias binding prior to this project. When I’m walking, that little detail adds sex appeal. Overall, I love the way it turned out! This was the most thoughtful project I’ve ever worked on aside from the Burda Odysee http://wp.me/a2dcK6-9L. Careful consideration had to be taken, after all, there were 75 instructions to complete which was a confidence booster in itself! Even my husband, the ultimate critic was impressed by my skills which was enough to make me do the happy dance!

20130512-224950.jpg

20130512-225238.jpg